
Creating a Penguin Pom-Pom: Adding Details
.png)
To create your own pom-pom using the pom-pom maker, follow these simple steps:

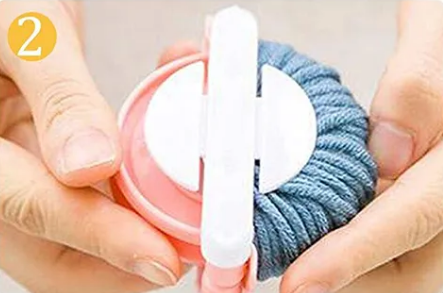
1. Wrapping yarn:
Start by wrapping your dominant color around the first side of the pom-pom maker. It is of great importance to tighten the thread tightly to achieve density and even pom-pom. Use the other two colors in different places on the pom-pom maker, stop one color by cutting the wool and start over with another color. Be sure to cover only a small area with both colors for a successful spotted effect.
2. Repeat on both sides:
Repeat the operation on the other side of the pom-pom, making sure that the structure is completely filled, and the pom-pom maker is tightly closed. This ensures uniformity and density throughout the pom-pom.

3. Open the pom-pom:
To open the pom-pom, cut the yarn with your scissors into the hole provided for this purpose. Then, slip a piece of yarn into the notch and tie several simple knots tightly, leaving a piece of yarn long enough to fasten on the pom-pom.

4. Trimming for evenness:
If your pom-poms look a little uneven, trim with a pair of scissors to make sure they are nice and rounded. This step is necessary to achieve a polished and professional-looking pom-pom.

5. Enjoy your unique creativity:
This method will result in a beautifully made pom-pom that you can use for various decorative or cosmetic purposes. Let your creativity soar as you enjoy the process of creating your own unique pom poms!

Creating a Penguin Pom-Pom: Adding Details
After creating your individual pom-poms, you can assemble them to form the body of a penguin. Here's how you can add eyes, a nose, and a scarf to complete the look:

1. Assembling the Penguin:
Stack one pom-pom on top of the other to create the body of the penguin. Ensure that they are securely attached to each other using a strong adhesive or by tying them together with yarn.

2. Adding Eyes:
Use small pins or buttons to create the eyes for your penguin. Simply attach them to the top pom-pom to give your penguin its characteristic look.

3. Creating the Nose:
For the nose, you can use a small piece of black paper or black felt. Cut it into a triangular shape and attach it between the eyes on the top pom-pom to complete the penguin's face.

4. Making the Scarf:
To give your penguin some winter flair, create a scarf using paper or rubber. Cut a thin strip of colored paper or rubber and wrap it around the penguin's neck, tying it in a knot or bow at the front.

5. Additional Details:
Get creative with additional details like wings or feet by cutting out shapes from felt or fabric and attaching them to the sides or bottom of the bottom pom-pom.

6. Display Your Penguin:
Once all the details are added, your penguin pom-pom is ready to be displayed! Place it on a shelf, use it as a festive decoration, or give it as a thoughtful handmade gift to someone special.

Creating a penguin pom-pom adds a fun and whimsical touch to your crafting projects. Experiment with different colors, sizes, and embellishments to make each penguin unique. Enjoy the process of bringing your adorable pom-pom penguin to life!


